
Main Courses
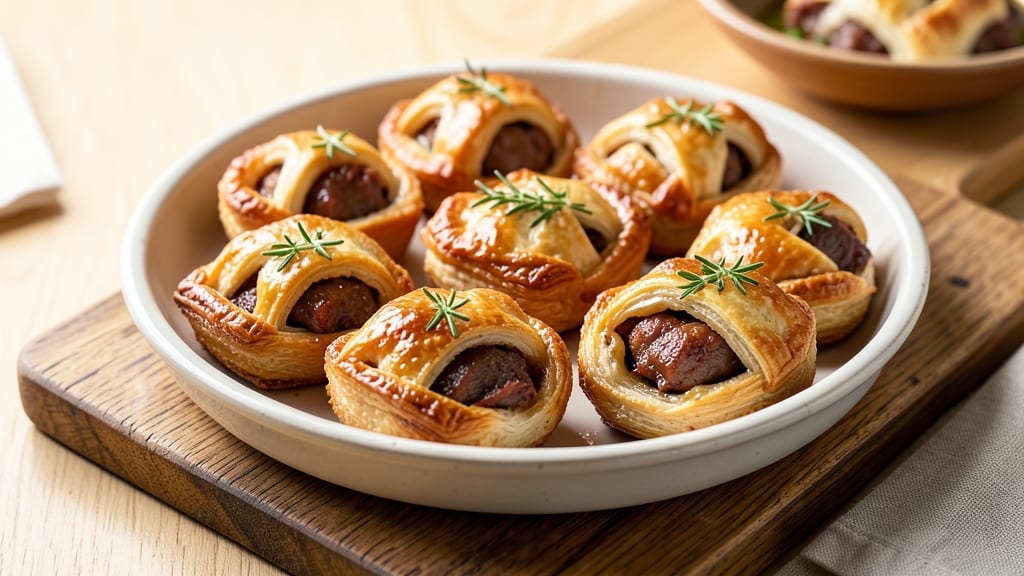
This mini pork pie recipe delivers all the savory, buttery perfection of traditional pork pies—just in bite-sized portions. 💛 I developed this version after years of perfecting the balance between a crisp, golden crust and a rich, seasoned pork filling that practically melts in your mouth.
The secret lies in a suet-based crust that stays tender while developing that signature flaky, caramelized edge.
The filling combines ground pork with classic seasonings like thyme, nutmeg, and a touch of vinegar for brightness—just like my grandmother used to make, but with a few modern shortcuts.
We'll use a foolproof rolling technique for the crust and a precise crimping method to ensure those iconic crowns bake up perfectly every time. No more soggy bottoms or uneven tops here.
By the time these crispy mini pork pies emerge from the oven, you'll have golden, flaky crowns with a tender yet sturdy base. The filling stays moist and flavorful, with just enough seasoning to make each bite satisfying.
These are perfect for parties, game days, or as a sophisticated appetizer that feels like a restaurant-quality treat.
Serve them warm with a side of mustard or a crisp green salad for a complete meal. The recipe scales easily, so you can make a dozen for a gathering or just a few for a cozy night in.
Let's get started on these classic British bites with a Southern twist!
Ingredients for mini pork pie
Twelve crispy bites with golden crowns—just the right amount for sharing or snacking.
| Ingredient | Amount | Notes |
|---|---|---|
| Ground Pork 🥩 | 1 ½ lb | Lean or regular, not extra lean |
| All-Purpose Flour 🌾 | 2 cups | For crust, all-purpose preferred |
| Suet 🧈 | ½ cup | Beef suet, finely chopped (or pre-shredded) |
| Cold Unsalted Butter 🧈 | ½ cup | Cubed, not softened (key for flakiness) |
| Ice Water 💧 | ¼ cup | For dough elasticity |
| Fresh Thyme Leaves 🌿 | 1 tbsp | Or 1 tsp dried thyme (dried works in pinch) |
| Ground Nutmeg 🌶️ | ½ tsp | Freshly grated nutmeg preferred |
| White Wine Vinegar 🍷 | 1 tbsp | Brightens filling (sub apple cider vinegar) |
| Diamond Crystal Kosher Salt 🧂 | 1 ½ tsp | For crust and filling (adjust to taste) |
| Ground Black Pepper 🌶️ | ½ tsp | Freshly ground for best flavor |
| Egg Yolk 🥚 | 1 whole | For egg wash (white would work too) |
| Milk 🥛 | 1 tbsp | For egg wash (whole milk preferred) |
| Pork Pie Weights 🔥 | 12 whole | Small metal weights (or pie weights) |
The suet is non-negotiable here—it keeps the crust tender while giving that classic flaky texture. King Arthur Flour sells pre-shredded beef suet, but if you're at Costco, grab a whole pound and freeze the rest. The butter should be ice cold when you cut it into cubes—wrap them in plastic wrap and chill for 30 minutes if your kitchen's warm. For the pork, Armour or Hormel brands work best—they're finely ground and lean enough to stay moist without making the crust soggy. If you can't find fresh thyme, Trader Joe's dried thyme in the bulk section is my go-to.
No suet? Coconut oil or lard at half the amount works in a pinch, but texture won't be identical. Running short on vinegar? Lemon juice at the same amount gives similar brightness. The crust can be made ahead and chilled for 24 hours—it actually tastes better after resting. For the filling, if you're feeling fancy, add 1/4 cup finely chopped onion (sautéed first) for extra depth. And if you're making these for a crowd, double the recipe—just use a 15x10-inch jelly roll pan for baking.
The crust dough keeps for 2 days wrapped tightly in plastic, but the filling should be made fresh to avoid sogginess. Assembled pies can be refrigerated for 4 hours before baking—perfect if you're prepping ahead for a party. Once baked, they're best eaten within 2 days, though they'll stay crispy for 3 days if stored in an airtight container. Reheat in a 350°F oven for 5 minutes to restore that golden crunch—microwaving makes them rubbery.
Why You'll Love This Recipe
- No-Fuss Dough: I swear by this suet-and-flour crust—no rolling, no fuss, just mix cold butter and ice water until it clumps. The secret’s in the cold ingredients; they create flaky layers without the stress of pie crust.
- Rich, Savory Bite: That ground pork gets tender but never dry, and the suet in the crust adds a buttery richness you’d expect from something much fancier. Honestly, it’s the kind of flavor that makes you forget it’s a simple recipe.
- Picnic or Party: These bite-sized pies travel like a dream—no plates needed, just grab and go. I’ve packed them for tailgates, potlucks, and even my kid’s soccer games (yes, even on a Tuesday night).
- Budget Wins: Ground pork stretches far, and the crust costs pennies. Between us, I’ve made a dozen of these for under $10—way better than store-bought pastries, and no one ever guesses how cheap they are.
Step-by-step instructions for mini pork pies
Here's how to make these golden, flaky mini pork pies with a crispy crown and tender filling.
👨🍳 Step 1: Mix the Filling and Prepare the Dough
In a large bowl, combine the 1.5 lb ground pork, 1 tbsp fresh thyme leaves, 0.5 tsp ground nutmeg, 1 tbsp white wine vinegar, 1.5 tsp kosher salt, and 0.5 tsp ground black pepper. Mix gently with your hands until just combined—don't overwork the pork or it'll turn tough. Set aside.
In another bowl, whisk together the 2 cups all-purpose flour, 0.5 cup finely chopped suet, and 0.5 cup cold cubed butter until the mixture resembles coarse crumbs. Gradually add the 0.25 cup ice water and mix with a fork until the dough just comes together. It'll be slightly sticky, but don't add extra water—this keeps the crust tender. Shape into a ball, wrap in plastic, and chill for 30 minutes.
🍳 Step 2: Roll and Cut the Dough
Preheat your oven to 425°F and line two baking sheets with parchment paper. Roll out the chilled dough on a lightly floured surface to about 1/8-inch thickness. Use a 3-inch round cutter to cut out 24 circles—you'll need two circles per pie. Keep the scraps and reroll them once to make more dough.
For the tops, use a 2-inch round cutter to cut out smaller circles from the same dough. You'll need one top per pie. Place the larger circles on your prepared baking sheets and gently press the filling into the center of each, leaving a 1-inch border around the edges. This ensures room for the filling to expand as it cooks.
🥘 Step 3: Assemble and Crimp the Pies
Place one of the 2-inch top circles over each filled bottom, pressing gently to seal the edges. Use your fingers or a fork to crimp the edges, creating a decorative pattern. This isn't just for looks—it helps seal the filling inside. Place a pork pie weight on each pie to keep them flat as they bake.
In a small bowl, whisk together the 1 whole egg yolk and 1 tbsp milk for the egg wash. Brush this mixture over the tops of all the pies—this creates that gorgeous golden crust. Bake for 25-30 minutes until the crusts are deep golden brown and the filling is bubbling through the vents.
⏰ Step 4: Finish and Serve
Remove the pies from the oven and let them cool on the baking sheets for 5 minutes before transferring to a wire rack. The crusts should be crispy and the filling hot and juicy. If you didn't cut any vents in the tops, use a small knife to make a tiny slit in each one to let steam escape.
Serve warm with a sharp mustard or a simple green salad. The contrast of the crispy, flaky crust with the savory pork filling makes these mini pork pies irresistible. Store any leftovers in an airtight container for up to 3 days, though they're best enjoyed fresh!
Pro Tips For Making Mini Pork Pie
- CHILL THE SUET: Grate it yourself or buy pre-grated, but never use warm suet—it’ll turn your dough greasy and sticky. Pop the block in the freezer for 10 minutes first, then grate it fine. (Yes, even if you’re impatient like me.)
- WORK THE DOUGH FAST: Use a stand mixer with the paddle attachment—it cuts butter and suet into the flour way faster than by hand. Pulse for 20 seconds, then let the dough rest 10 minutes before shaping. (This isn’t the prettiest method, but it’s the tastiest.)
- DON’T OVERHANDLE THE PORK: When mixing the filling, just combine the ground pork with flour and seasonings—no need to overwork it. Overmixing makes the texture dense instead of light and crumbly. (I learned this the hard way after a gummy disaster.)
- SEAL THE EDGES WELL: Brush the top crust with ice water and pinch the edges tightly before baking. This prevents the filling from leaking out and keeps the crust crisp. (Your future self will thank you—trust me.)
Essential equipment for mini pork pie
Pastry Tools Essentials
Start with a 12-inch rolling pin—I swear by my Lodge cast iron one, but any quality pin works. For precision cutting, grab a 3-inch round cutter for the bases and a 2-inch cutter for tops.
My Wilton non-stick silicone cutter is my go-to because it glides through the dough without sticking. Don’t skip the pork pie weights—I use 12 small metal weights (or pie weights) to keep the tops flat during baking. 💛
Mixing & Prep Gear
For the dough, a large mixing bowl with high sides prevents messes when adding ice water. I prefer stainless steel because it’s durable and easy to clean. A sharp chef’s knife is crucial for chopping suet—King Arthur’s pre-shredded suet saves time if you’re short on prep hours.
For measuring, a digital scale ensures accuracy, especially with the 0.5 cup suet and 0.5 cup butter. 🧈
Baking Must-Haves
Line your baking sheets with parchment paper—it prevents sticking and makes cleanup effortless. I use two half-sheet pans (13x18 inches) to fit all 12 pies comfortably. A wire cooling rack is essential for crispy crusts—don’t stack them directly on the counter!
For the egg wash, a small bowl and pastry brush (or clean hands) work perfectly. Preheat your oven to 425°F using the middle rack for even heat distribution. 🔥
Optional Upgrades
If you’re feeling fancy, a pork pie mold (like Wilton’s mini pie molds) eliminates the need for cutters and ensures uniform shapes. For a professional touch, invest in a fork or crimping tool—I use a Wilton decorative pastry fork to create those classic crowns.
A thermometer isn’t mandatory, but it helps confirm the filling reaches 165°F for food safety. 💡
Budget-Friendly Swaps
No rolling pin? A clean wine bottle works in a pinch—just roll the dough between your hands. Skip the weights? Use dried beans or rice instead. For cutters, a glass or small plate can substitute.
The most critical swap is butter vs. shortening—if you’re out of butter, Crisco keeps the crust flaky, though it lacks flavor. 💪
Nutrition facts
Frequently asked questions
Can I make these mini pork pies ahead of time?
The dough can be prepared and chilled for 24 hours ahead, but the filling should be made fresh to prevent sogginess. Assembled pies can be refrigerated for 4 hours before baking—ideal for party prep. Once baked, they stay crispy for 3 days in an airtight container. Reheat at 350°F for 5 minutes to restore that golden crunch.
Why does my crust turn out soggy instead of crispy?
Soggy crusts usually happen from overworked dough or underbaked filling. Keep the butter and suet ice cold when mixing, and handle the dough minimally. Bake until the filling reaches 165°F—if the crust browns too fast, tent with foil. Also, ensure your oven is fully preheated to 425°F for that signature crisp.
What can I substitute for suet in the crust?
For a tender crust, use ½ cup coconut oil or lard instead of suet, though texture won't be identical. If avoiding dairy, vegetable shortening works in a pinch. For a lighter option, try ½ cup mashed potato flakes mixed with the flour—it adds moisture without heaviness. Always chill the dough thoroughly before rolling.
How do I make these gluten-free?
Replace the all-purpose flour with a 1:1 gluten-free flour blend (like Bob's Red Mill) and add ½ tsp xanthan gum to improve binding. For the filling, use ground pork with no additives. The crust may be slightly crumbly, so brush with extra egg wash for crispiness. Bake at 400°F instead of 425°F to prevent burning.
Can I freeze mini pork pies?
Freezing isn't recommended for these delicate pies—the crust loses crispness. However, you can freeze the unbaked dough for 2 months or the cooked filling separately for 3 months. Reheat filling to 165°F before reassembling with fresh crust. For best results, enjoy them fresh or reheat within 3 days of baking.