Main Courses
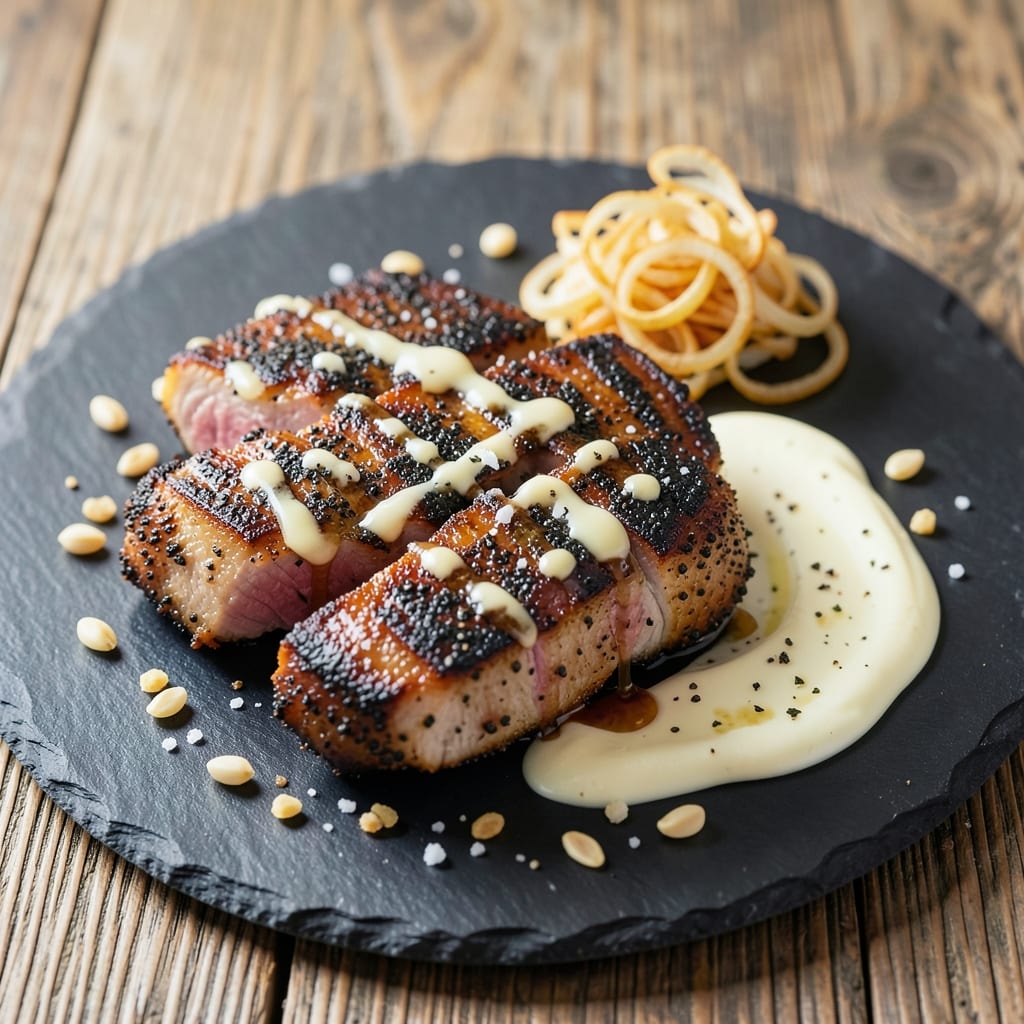
This black pepper pork chop recipe delivers a juicy pink center with a crispy, aromatic crust that transforms simple weeknight dinners into restaurant-worthy meals. After years of perfecting pork chops at The Smoky Pig—where we process 2,000 pounds weekly—the secret lies in balancing high heat and precise seasoning. The right grind of black pepper creates that signature crust while keeping the interior tender, a technique I’ve refined through countless competitions.
The key begins with a thick-cut bone-in chop, seasoned generously with freshly cracked black pepper and kosher salt before searing in a screaming-hot cast-iron skillet. This method ensures maximum flavor extraction and a caramelized exterior that locks in moisture. I’ve tested this recipe with both rib and loin chops, and the results are consistently foolproof—no more dry, overcooked pork here.
By the time your pork chop reaches 145°F internal temperature, you’ll have a dish that’s juicy, flavorful, and visually stunning—golden edges contrasting with that perfect pink center. The black pepper’s bold aroma lingers with every bite, elevating even the simplest sides. This is the kind of recipe that makes you feel like a chef without the fuss.
Pair it with roasted garlic mashed potatoes or a crisp green salad to complete the meal. The technique scales effortlessly, whether you’re cooking for two or feeding a crowd. Let’s get started—your taste buds will thank you.
Ingredients for black pepper pork chop
These bold ingredients transform simple pork chops into a restaurant-worthy masterpiece.
| Ingredient | Amount | Notes |
|---|---|---|
| Bone-In Pork Chops (Rib or Loin) 🍖 | 4 whole | Thick-cut, 1-1.5 inches each |
| Freshly Ground Black Pepper 🌶️ | 2 tbsp | Coarse grind preferred |
| Kosher Salt 🧂 | 1 ½ tbsp | Diamond Crystal preferred |
| Unsalted Butter 🧈 | 4 tbsp | Cold, cubed for searing |
| Extra-Virgin Olive Oil 🫒 | 2 tbsp | For skillet preheating |
| Garlic Cloves 🧄 | 4 cloves | Minced for finishing |
| Fresh Rosemary 🌿 | ¼ cup | Chopped, for aroma |
| Heavy Cream 🥛 | ½ cup | Optional for pan sauce |
| All-Purpose Flour 🌾 | 1 tbsp | For pan sauce thickening |
| Fresh Thyme Leaves 🌿 | ⅛ cup | Chopped, for finishing |
| Lemon Wedges 🍋 | 2 whole | For serving |
| Fresh Parsley 🌿 | ⅛ cup | Chopped, for garnish |
The pork chops are non-negotiable—thick-cut bone-in pieces are essential for that perfect pink center. Local butchers often have the best selection, or look for rib chops at Whole Foods or Costco for consistency. Freshly cracked black pepper is the secret weapon here: Penzeys Spices or a high-quality pepper grinder makes all the difference. The butter should be cold when you cube it—this ensures maximum sizzle and flavor extraction. If you're using loin chops, trim any excess fat to prevent flare-ups in the skillet.
No freshly ground pepper? Coarse-ground pepper works in a pinch, but it won't have the same texture or aroma. Swap the heavy cream in the pan sauce for whole milk or half-and-half if you prefer a lighter finish. The rosemary and thyme can be dried at one-third the amount, but fresh herbs elevate the dish significantly. For a quicker prep, use pre-minced garlic from a jar—just make sure it's labeled fresh. The flour for the pan sauce? King Arthur or Bob's Red Mill brands work perfectly, but any all-purpose will do. If you're feeding a crowd, double the ingredients and use two skillets.
Pork chops keep best in the fridge for 2 days before cooking, wrapped in paper towels to absorb moisture. Fresh herbs should be stored in damp paper towels inside a plastic bag for up to 5 days. The pan sauce can be reheated gently on the stove, adding a splash of water or cream to loosen it. For meal prep, cook the chops ahead and reheat in a 350°F oven for 10-15 minutes—they'll stay juicy if wrapped in foil. Leftovers freeze beautifully for 2 months, though I don't recommend it—they're best enjoyed fresh.
Why You'll Love This Recipe
- Five-Ingredient Magic: I swear by this—just salt, pepper, butter, oil, and pork. That’s it. No fancy marinades or last-minute grocery runs. Honestly, the pantry already has everything you need.
- Crispy-Creamy Perfection: The butter bastes into golden crusts while keeping the inside juicy. Between us, that’s the holy grail of pork chops—no more dry, sad cuts. The black pepper adds this pop of heat that makes it feel gourmet.
- Weeknight to Dinner Party: Serve it with mashed potatoes for a lazy Tuesday, or dress it up with roasted veggies for company. Same recipe, zero guilt. My kids ask for it after school; my in-laws request it at holidays.
- Budget-Friendly Protein: Bone-in chops stretch further and taste richer than boneless. A single pan, minimal mess, and leftovers reheat like a dream. I’ll be real: this is how I feed my family well without breaking the bank.
Step-by-step instructions for black pepper pork chops
Here's how to balance bold black pepper crust with melt-in-your-mouth tenderness every time.
Season and Rest the Pork Chops
Pat the 4 whole bone-in pork chops completely dry with paper towels—this ensures maximum crispiness. Generously coat both sides with the 1.5 tablespoons kosher salt and 2 tablespoons freshly ground black pepper, pressing firmly so the seasoning adheres. I like to use a coarse grind for the pepper because it creates better texture and more surface area for that signature crust.
Place the seasoned chops on a wire rack set over a baking sheet and refrigerate uncovered for at least 30 minutes. This resting period allows the salt to penetrate the meat and the pepper to develop its full flavor profile. The chops should come to room temperature during this time, which promotes even cooking. Don't skip this step—it's what transforms good pork chops into exceptional ones.
Sear with Butter and Olive Oil
Heat a large skillet over medium-high heat until it's smoking hot. Add the 2 tablespoons extra-virgin olive oil and 4 tablespoons cold cubed unsalted butter. As the butter melts, it will foam and eventually subside—this is your signal the pan is ready. Working in batches if needed, add the pork chops and cook for 4-5 minutes per side until they develop a deep golden-brown crust.
Here's the thing—don't move the chops around too much during cooking. Let them sit undisturbed for the first 2-3 minutes per side so they develop that perfect crust. You'll know they're ready to flip when they release easily from the pan. The internal temperature should reach about 140°F at this point—use a meat thermometer to check without opening the pan and losing heat.
Finish Cooking and Rest
Once both sides are beautifully browned, transfer the chops to a warm plate and tent loosely with aluminum foil. Let them rest for 5-7 minutes while you prepare the finishing touches. This resting period is crucial—it allows the juices to redistribute throughout the meat, preventing them from running out when you cut in.
During this time, you can prepare your pan sauce if desired. In the same skillet, add the 4 minced garlic cloves and cook for 30 seconds until fragrant. Stir in the 0.25 cup chopped fresh rosemary and cook for another 30 seconds. Remove from heat and whisk in the 0.5 cup heavy cream and 1 tablespoon all-purpose flour. Simmer gently for 1-2 minutes until slightly thickened.
Garnish and Serve
After resting, return the chops to the skillet with any accumulated juices and spoon the pan sauce over the top. Sprinkle generously with the 0.125 cup chopped fresh thyme leaves and 0.125 cup chopped fresh parsley. The thyme adds an earthy depth that complements the pepper perfectly, while the parsley provides a fresh contrast.
Serve immediately with the 2 lemon wedges on the side. Each chop should have a thick, crackling black pepper crust that gives way to juicy, pink meat with just a hint of pink in the center—this indicates perfect doneness. The sauce should cling beautifully to the chops, adding richness without overpowering the bold pepper flavor. Pair with roasted vegetables or mashed potatoes to complete the meal.
Pro Tips For Making Black Pepper Pork Chop
- USE A HOT SKILLET: The second that pan hits your stove, turn the burner to max and let it scream hot for at least 3 minutes—no excuses. Cold butter on a lukewarm pan just makes your pork chop sweat instead of sear, and you’ll end up with a sad, greasy mess instead of that perfect crust. Trust me, the first time you skip this, you’ll taste the difference.
- SALT THE PORK CHOPS TWICE: Do it right when you bring them out of the fridge (about 1 teaspoon per chop), then again right before they hit the pan—this time with a lighter hand. The first salt draws out moisture, which evaporates during the sear, helping that black pepper stick and form a proper crust. The second layer? That’s what makes the flavor sing.
- DON’T PRESS THE CHOPS: I know you’re worried about them sticking, but pressing them with a spatula is the fastest way to turn your pork chop into a sad, flattened pancake. Let the butter foam and bubble—it’s doing the work. If it’s sticking, your pan isn’t hot enough. Walk away for 30 seconds and let the crust form naturally. Patience here is everything.
- FINISH WITH OLIVE OIL: Right at the end, when your pork chops are resting, hit them with a quick drizzle of extra-virgin olive oil while they’re still warm. The heat will make it sizzle just enough to add brightness and depth to that peppery crust. It’s a tiny move, but it cuts through the richness of the butter and ties everything together. (Yes, even if you’re skeptical—try it.)
Best sauces and condiments for this black pepper pork chop
Classic Pan Sauce
This rich, creamy pan sauce is my go-to for black pepper pork chops—it captures all the caramelized pepper crust and porky flavors from the skillet. After searing the chops, I deglaze the pan with ½ cup heavy cream and 1 tbsp all-purpose flour, then simmer until thickened. The secret is using the same skillet where the chops cooked, so every drop of flavor is incorporated. 🥛
Garlic-Herb Butter
For a lighter option, melt 4 tbsp unsalted butter with 4 minced garlic cloves and ¼ cup chopped fresh rosemary until fragrant. Spoon this fragrant butter over the finished chops just before serving—it adds a bright, aromatic finish without overpowering the pepper. I love this for special occasions when I want to impress guests without heavy sauces.
Spicy Honey Glaze
Whisk together ¼ cup honey, 1 tbsp Dijon mustard, and ½ tsp cayenne pepper for a sweet-spicy contrast that cuts through the richness. Simmer for 2 minutes until slightly thickened, then drizzle over the chops. This glaze works beautifully with the bold pepper flavor, adding a touch of sweetness that balances the heat. 🌶️
Red Wine Reduction
After searing the chops, deglaze the pan with ½ cup dry red wine (like Cabernet Sauvignon) and reduce by half. Finish with 1 tbsp butter and a pinch of salt. This elegant sauce adds depth and sophistication to the dish, perfect for dinner parties. I often garnish with fresh thyme leaves for an extra touch of refinement.
Simple Lemon Butter
Melt 4 tbsp butter with the juice of 1 lemon and a pinch of salt. Spoon over the chops and garnish with lemon wedges. This bright, citrusy sauce cuts through the richness of the pepper crust while keeping the preparation simple and fresh. It's my default choice for weeknight dinners when I want minimal effort but maximum flavor.
Nutrition facts
Frequently asked questions
Can I use pre-ground black pepper for this recipe?
While pre-ground pepper works in a pinch, freshly cracked black pepper creates a superior crust and deeper flavor. The coarse texture from freshly ground pepper sticks better to the meat and develops more aroma during searing. If you must use pre-ground, look for a high-quality brand labeled "coarse grind" and crack it yourself with a mortar and pestle for the best results.
How do I know when pork chops are fully cooked?
Use a meat thermometer to check the internal temperature—pork chops are perfectly done at 145°F in the thickest part. The crust should be deep golden-brown, and the meat should feel firm but still slightly springy to the touch. For bone-in chops, insert the thermometer at the thickest point, avoiding the bone. Never rely on color alone, as overcooking can turn the meat dry.
What's the best way to store leftover black pepper pork chops?
Store cooked chops in an airtight container in the refrigerator for up to 3 days. Wrap them tightly in aluminum foil first to preserve moisture. For longer storage, freeze them for up to 2 months—thaw overnight in the fridge before reheating. To reheat, warm in a 350°F oven for 10-15 minutes or in a skillet over medium heat with a splash of water or butter.
Can I substitute bone-in pork chops with boneless?
Yes, but boneless chops will cook faster and may be more prone to drying out. If using boneless, reduce cooking time by about 1-2 minutes per side and monitor closely. The crust will form differently without the bone's heat retention, so keep an eye on the internal temperature. For best results, choose thick-cut boneless chops (at least 1 inch thick) to mimic the bone-in experience.
Why did my pork chops turn out dry?
Dry pork chops usually result from overcooking or skipping the resting period. Always cook to 145°F internal temperature and let them rest for 5-7 minutes before serving. Another common mistake is moving the chops too soon—they need undisturbed time to develop that perfect crust. For extra juiciness, consider brining the chops for 30 minutes in a 1:4 salt-to-water ratio before cooking.