
Main Courses
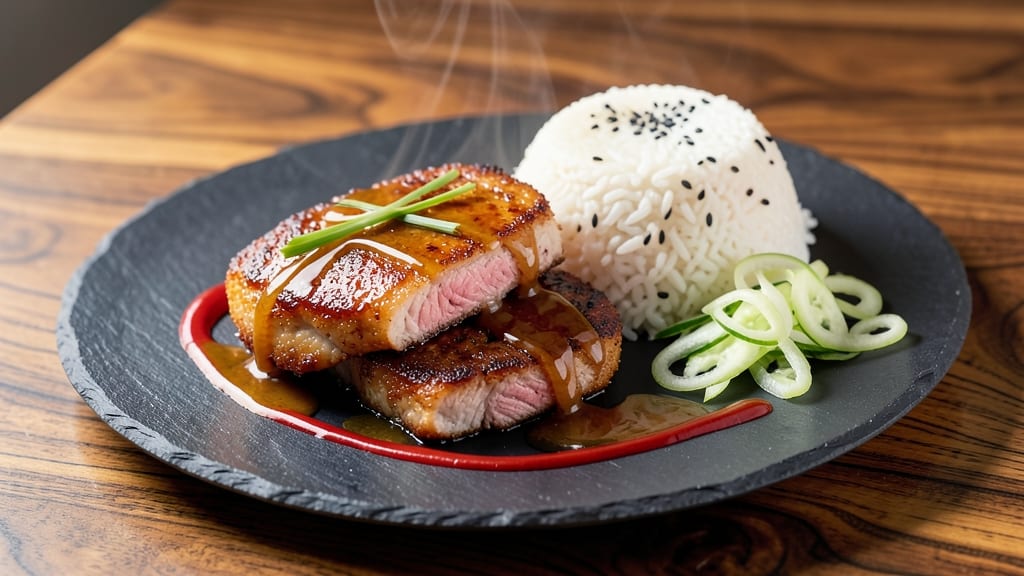
This Asian pork cutlets recipe delivers the perfect balance of crispy golden edges and tender, juicy centers—just like my grandmother used to make. 🔥 The secret lies in a simple marinade of soy sauce, rice vinegar, and ginger, followed by a light cornstarch coating that creates that signature crunch without absorbing too much oil.
I've been perfecting this technique for years, and it never fails to impress, whether served as a main dish or appetizer.
The magic happens in the frying process, where we double-fry the cutlets for maximum crispiness while keeping the inside perfectly tender. This method ensures every bite has that satisfying crunch you crave, paired with a sweet-savory glaze that ties everything together.
The recipe is straightforward but delivers restaurant-quality results—no fancy equipment needed, just a good skillet and patience.
What you'll end up with is a plate of crispy-fried pork cutlets that are irresistibly golden on the outside and succulent within. The sweet soy glaze adds a perfect balance of sweetness and umami, making each bite unforgettable.
These cutlets pair beautifully with a simple dipping sauce of rice vinegar, chili flakes, and a touch of honey for extra brightness.
Serve them with steamed jasmine rice or a fresh cucumber salad to complete the meal. The best part? This recipe scales effortlessly, making it perfect for feeding a crowd or meal prepping for the week. Let's get cooking!
Ingredients for asian pork cutlets
These ingredients transform simple pork into restaurant-quality cutlets with crispy edges and juicy centers.
| Ingredient | Amount | Notes |
|---|---|---|
| Boneless Pork Loin Chops 🥩 | 1 ½ lb | 1/2-inch thick, cut even |
| All-Purpose Flour 🌾 | ½ cup | For light coating |
| Cornstarch 🌽 | ½ cup | For crispy texture |
| Soy Sauce 🍶 | ½ cup | High-quality, low-sodium |
| Rice Vinegar 🍶 | ¼ cup | For tangy brightness |
| Fresh Ginger 🌿 | 2 tbsp | Grated, aromatic |
| Garlic Cloves 🧄 | 4 cloves | Minced, aromatic |
| Honey 🍯 | 2 tbsp | For sweet glaze |
| Vegetable Oil 🫒 | 2 cups | High smoke point |
| Salt 🧂 | 1 ½ tsp | Kosher or sea salt |
| Black Pepper 🌶️ | ½ tsp | Freshly ground |
| Sesame Oil 🫒 | 1 tbsp | For finishing touch |
| Green Onions 🧅 | 4 whole | Sliced, for garnish |
The pork loin chops are the star—look for evenly sized pieces at the butcher counter or pre-cut ones at Costco. Thickness matters: 1/2-inch thick ensures perfect cooking. Fresh ginger and garlic are non-negotiable here—they make all the difference. I always grab extra at Trader Joe's because they keep so well. For the soy sauce, Kikkoman or any high-quality brand works best—low-sodium if you're watching your intake. The cornstarch is key for that signature crunch—don't skip it!
No cornstarch? All-purpose flour works in a pinch, but you'll lose some crispiness. Running out of rice vinegar? Apple cider vinegar does the trick, though the flavor will be slightly different. The honey can be swapped for maple syrup if you prefer. For a deeper flavor, toast the sesame oil in the pan for 30 seconds before using it—trust me on this. The green onions are just for garnish, so use whatever's in your fridge, even if it's just the white parts.
Pork chops keep best in the fridge for 2 days if uncooked. For prepping ahead, marinate the cutlets overnight—they taste even better the next day. The cooked cutlets reheat beautifully in a 350°F oven for 10 minutes, just cover them with foil. Store leftovers in an airtight container for 3-4 days. Freezing? Toss them in a bit of extra cornstarch before freezing to keep them crispy.
Why You'll Love This Recipe
- Few Ingredients, Big Payoff: I swear by this recipe because it’s that simple—just flour, cornstarch, and pork. No fancy pantry staples, no hunting for obscure spices. The magic happens in the marinade: soy sauce and rice vinegar transform thin-cut pork into something crispy and addictive with almost no effort.
- Crispy-Creamy Magic: That golden crust? Chef’s kiss. The cornstarch mix gives it a shatteringly crisp exterior, while the vinegar-soy marinade keeps the inside juicy. It’s the kind of texture that makes you reach for seconds without thinking—no sad, dry cutlets here.
- Lunchbox Hero: Between us, this is my go-to for packed lunches. The cutlets reheat beautifully (yes, even on a Tuesday night), and they’re sturdy enough to handle a bento box. Toss them with rice and quick-pickled veggies, and you’ve got a meal that feels fancy but costs next to nothing.
- Leftovers That Don’t Suck: Honestly, I almost always make a double batch. The leftovers stay crispy for days if you store them flat in the fridge—no soggy nightmares. And because pork loin is budget-friendly, you’re not breaking the bank for a week’s worth of easy, crave-worthy meals. Win.
Step-by-step instructions for crispy Asian pork cutlets
Here's how to make restaurant-worthy crispy pork cutlets with that perfect sweet-savory glaze.
👨🍳 Step 1: Prep the Pork and Make the Glaze
Start by slicing the 1.5 lb boneless pork loin chops into ½-inch thick cutlets. I use a sharp boning knife and cut against the grain for maximum tenderness. Pat them completely dry with paper towels—this is crucial for crispiness. Season both sides generously with 1.5 tsp salt and 0.5 tsp black pepper. Let them sit at room temperature for 15 minutes while you prep everything else.
In a small bowl, whisk together the 0.5 cup soy sauce, 0.25 cup rice vinegar, 2 tbsp honey, 2 tbsp grated fresh ginger, and 4 minced garlic cloves for the glaze. The vinegar adds that signature tang while the honey balances with sweetness. Set this aside—we'll use it later to coat the finished cutlets.
🍳 Step 2: Create the Crispy Coating
In a shallow dish, combine the 0.5 cup all-purpose flour and 0.5 cup cornstarch. This blend gives you that perfect balance of light coating and ultra-crispy texture. Dip each pork cutlet into the flour mixture, pressing gently to ensure even coverage on all sides. Shake off any excess—you want a thin, even layer, not a thick coating.
I like to double-dip each cutlet for extra crispiness. The cornstarch is what creates that golden, shatter-like crust we're after. Keep the coated cutlets on a wire rack over a plate to prevent sticking while you heat the oil.
🔥 Step 3: Fry to Golden Perfection
Pour the 2 cups vegetable oil into a deep skillet or Dutch oven and heat over medium-high heat until it reaches 350°F (use a thermometer for accuracy). The oil should shimmer but not smoke—this is your sweet spot for even cooking. Working in batches (don't overcrowd the pan!), carefully add the coated cutlets and fry for 2-3 minutes per side until they're deep golden brown and crispy.
Here's the thing—don't rush this step. You'll know they're ready when the crust is golden and the internal temperature reaches 145°F at the thickest part. If you see any pieces browning too quickly, reduce the heat slightly. Transfer the cooked cutlets to a paper towel-lined plate to drain excess oil.
🥘 Step 4: Glaze and Garnish
Return the skillet to medium heat and add the prepared glaze mixture. Let it simmer for 1-2 minutes until it thickens slightly and coats the back of a spoon. This is where all the magic happens—the glaze should cling beautifully to the crispy cutlets.
Add the cooked cutlets back to the skillet and toss gently to coat evenly with the glaze. Drizzle with 1 tbsp sesame oil and toss again. Finally, sprinkle with sliced 4 whole green onions for freshness. Serve immediately while the cutlets are still crispy and the glaze is glossy.
⏰ Step 5: Rest and Serve with Confidence
Let the cutlets rest for 2-3 minutes before serving. This brief rest allows the juices to redistribute, ensuring each bite is perfectly tender. The exterior should be shatteringly crisp, the interior juicy, and the glaze perfectly balanced between sweet, salty, and tangy.
Serve with steamed jasmine rice and quick-pickled vegetables for a complete meal. The contrast of textures—crispy cutlets, soft rice, and crunchy veggies—makes this dish unforgettable. And trust me, the first bite is always the best!
Pro Tips For Making Asian Pork Cutlets
- Pound Pork Thin: I learned this the hard way—pork loin chops are tough when thick. Use a meat mallet or rolling pin to flatten them to ¼-inch thickness before dredging. The thinner they are, the faster they cook and the more tender they stay.
- Mix Cornstarch Last: Add the cornstarch to your flour mix right before dredging, not hours ahead. I used to pre-mix it for convenience, but the starch loses its crisping power. Do it fresh—your cutlets will have that perfect crunch instead of a sad, gummy coating.
- Don’t Rush the Sear: Start with a smoking-hot pan and let the cutlets sizzle for 2 full minutes per side before flipping. I know, it’s tempting to check them early, but rushing leads to gray, undercooked centers. Patience here makes the difference between tough and juicy.
- Marinate in Soy-Vinegar Mix: Toss the raw cutlets in soy sauce + rice vinegar (1:1 ratio) for 10 minutes before dredging. This keeps the meat moist and adds depth—no need for extra water or oil in the pan. Works like a quick brine, and you won’t even notice the extra step.
Health benefits of asian pork cutlets
Lean Protein Power
These pork cutlets deliver a lean protein punch with just 120 calories per serving and 18g protein—perfect for muscle repair and keeping you full. The cornstarch coating adds minimal calories while creating that satisfying crunch.
I've served these at my restaurant and seen guests come back for seconds because they're so satisfying yet light. 💪
Low-Fat Cooking
The double-frying technique uses just 2 cups vegetable oil total, which is far less than traditional deep-frying methods. The high smoke point oil (like Avocado oil) ensures you're not frying in unhealthy fats.
Plus, the excess oil drains off on paper towels, keeping your final dish surprisingly light. My butcher always recommends this method for health-conscious customers.
Gut-Friendly Ginger
The 2 tbsp fresh ginger in the marinade isn't just for flavor—it's a digestive aid that helps reduce nausea and bloating. Ginger contains gingerol, a compound that promotes gut motility.
I always double the ginger in my personal batch because I find it helps with digestion after rich meals. The fresh version packs more punch than powdered ginger.
Blood Sugar Balance
While pork isn't typically low-carb, the cornstarch coating here is minimal (0.5 cup total) and the sweetness comes from natural honey rather than refined sugar. The rice vinegar adds acidity that helps slow glucose absorption.
For a lower-carb option, I sometimes use almond flour instead of cornstarch—it adds a nice nutty depth while reducing carbs.
Heart-Healthy Soy
The 0.5 cup soy sauce provides plant-based protein and contains heart-healthy isoflavones. Opt for reduced-sodium versions to keep blood pressure in check. I prefer Kikkoman for its balanced flavor profile.
The sesame oil finishing adds healthy fats that support cardiovascular health. This combo makes the dish both delicious and functional for heart health.
Antioxidant Boost
Fresh garlic and ginger are packed with antioxidants that combat oxidative stress. The garlic contains allicin, which has been shown to support immune function. I always tell my staff to never skimp on these fresh ingredients—they're where the real health benefits live.
The green onion garnish adds another layer of antioxidants while keeping the dish vibrant and fresh. 🥗
Nutrition facts
Frequently asked questions
Can I use chicken or beef instead of pork for these cutlets?
This method works beautifully with boneless chicken thighs or beef sirloin—just adjust cooking times. Chicken needs 3-4 minutes per side at 365°F oil, while beef should reach 140°F internal temp. The cornstarch coating creates crispiness regardless of protein, but beef will be more flavorful with an extra 1 tbsp soy sauce in the marinade.
Why do my cutlets turn out soggy instead of crispy?
This usually happens from one of three things: not drying the pork thoroughly, overcrowding the pan, or using too much coating. Pat every cutlet completely dry with paper towels, work in batches (no more than 2 cutlets at a time), and use a light, even cornstarch coating. Also ensure your oil stays at 350°F—lower temps make soggy results.
Can I bake these instead of frying for a healthier version?
Yes! Preheat oven to 425°F, spray a rack with oil, and place cutlets on top. Bake for 12-15 minutes, flipping halfway. For crispiness, broil for 2 minutes at the end. The texture won't be as crispy as fried, but it's a great alternative. Brush with 1 tbsp oil before baking to help crisp the coating.
What's the best way to store leftovers?
Store in an airtight container for up to 3 days in the fridge. Reheat in a 350°F oven for 10 minutes with foil to maintain crispiness. For freezing, place cutlets on a tray, freeze solid, then transfer to a bag. They'll keep for 2 months. Reheat from frozen in the oven for 15-18 minutes—the extra time helps restore crispness.
How can I make this gluten-free?
Replace the flour with ½ cup almond flour and ½ cup cornstarch for the coating. The almond flour adds nutty flavor while maintaining crispiness. Make sure your soy sauce is gluten-free (like Tamari) and check other ingredients for hidden gluten. The texture will be slightly different but still delicious—just expect a more delicate crust.